
After looking at how the TPMS works and the signs that a sensor battery is reaching the end of its life, we now come to a stage where a lot of damage can be avoided: changing tires.
Your TPMS sensor was working perfectly, you have a new tire installed and suddenly… no signal? The battery isn’t always to blame! Many sensors are damaged, forced, improperly reinstalled, or contaminated during tire removal or installation.
Why Does a Tire Change Represent a Risk?
The RDC sensor is mounted inside the rim, directly at the valve location.
During tire removal and installation, tools and tire beads pass very close to it.
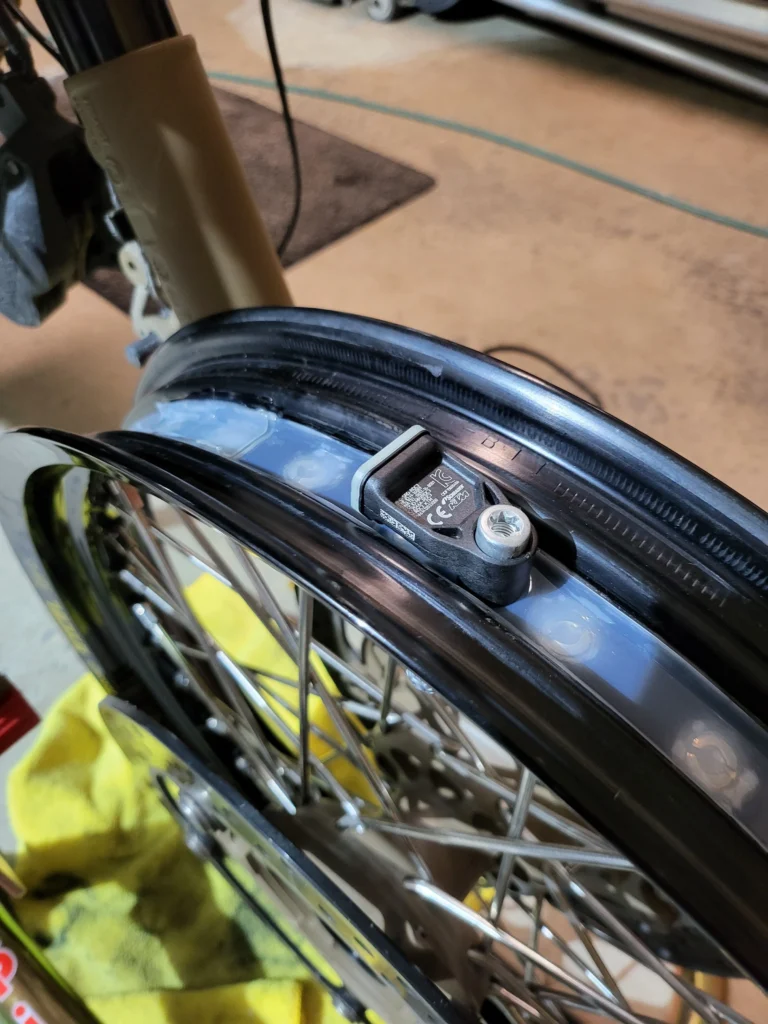
An incorrectly positioned wheel on the tire machine, a tire iron placed in the wrong location, or a tire bead forced against the valve can:
• Crack or break the sensor.
• Deform the metal valve stem.
• Damage the mounting system.
• Create a slow air leak after reassembly.
The sensor may also appear undamaged externally while having suffered enough impact to cause an immediate or delayed failure.
First Rule: Clearly Inform the Tire Technician
Before any work begins, it is important to mention that the wheel contains an RDC sensor inside the rim.
Even if the technician regularly works on modern motorcycles, this information should never be assumed to be obvious.
The technician must know the exact valve position in order to start and finish tire removal at the correct location.
The valve area must be treated carefully throughout the entire procedure.
What Should Be Kept During a Standard Tire Change?
If the sensor is operating correctly and shows no signs of damage, there is no need to replace it automatically.
In most cases, you keep:
• The original RDC sensor.
• The metal valve stem associated with the sensor, provided it is in perfect condition.
However, the sensor should be inspected before the tire is reinstalled.
In particular, check for:
• No cracks in the sensor housing.
• No significant corrosion.
• The condition of the valve stem and its threads.
• Proper sensor mounting.
• No deformation or impact marks.
Which Components Are Recommended for Replacement?
Even when the sensor itself is retained, some small sealing and fastening components can age over time.
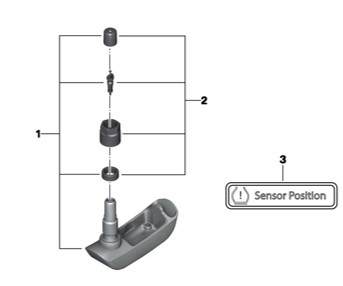
Depending on the design, the sensor service kit may include:
• The sealing O-ring.
• The valve core.
• The retaining nut.
• The washer or associated support component.
This assembly is often referred to as an RDC service kit or TPMS valve service kit.
Replacement is particularly worthwhile when:
• The valve stem is several years old.
• A slow leak has been detected.
• The nut or threads show signs of oxidation.
• The sensor has been removed from the rim.
• The condition of the sealing O-ring is uncertain.
Replacing a few small sealing components costs far less than removing the tire again a few weeks later to track down a leak.
Consider Providing the Service Kit Before the Appointment
In many workshops, a tire change simply involves removing the old tire and installing the new one.
If you want the RDC service kit components replaced (O-ring, valve core, nut, washer, depending on the design), it is best to provide them to the technician beforehand or confirm that they have been ordered.
In practice, many shops do not routinely stock the correct service kit for your particular sensor.
If you do not provide the kit and nothing has been arranged in advance, it is common for the original components to be reinstalled.
This does not necessarily cause an immediate problem, but when a valve stem or seal is already several years old, preventive replacement of these small components is often the safest approach.
Pay Attention to Valve Stem Torque
The valve retaining nut should never be tightened like a standard mechanical fastener.
The required torque is low and depends on the sensor type and mounting design.
A value of approximately 4 to 6 Nm is commonly seen, but the exact specification should always be verified for the specific sensor before reassembly.
Excessive tightening can:
• Crush or deform the seal.
• Damage the valve stem.
• Crack the sensor body.
• Create a leak instead of preventing one.
Tightening it more does not guarantee a better seal.
Can Tire Sealants Damage the TPMS Sensor?
Preventive tire sealants, emergency tire sealants, and some sealing compounds can come into contact with the TPMS sensor located inside the tire.
Depending on their composition, they may:
- Clog the pressure sensing port.
- Interfere with pressure readings.
- Contaminate the valve.
- Complicate tire removal and cleaning during the repair.
If an emergency tire sealant must be used, choose only a product that is clearly labeled as compatible with TPMS sensors (or electronic valves), and always follow the manufacturer’s recommendations.
After the sealant has been injected, it is normal for the sensor to temporarily display an incorrect pressure reading, lose signal, or trigger a warning. In many cases, normal operation is restored after the tire and sensor have been properly cleaned.
When the tire is repaired, always inform the technician that a tire sealant has been used so the tire, valve, and TPMS sensor can be properly inspected and cleaned.
Personally, whenever the situation and the type of puncture allow it, I prefer using a tire plug repair. In my opinion, an emergency tire sealant should remain a last-resort solution to get you safely to a repair shop.
Three Rules to Remember
1 – Always Inform the Technician About the RDC Sensors
The technician must know their location before beginning tire removal.
2 – Avoid Non-Compatible Preventive Sealants and Tire Repair Products
They can contaminate the sensor and interfere with its operation.
3 – Strictly Follow the Low Valve Stem Torque Specification
Excessive tightening can damage the sensor or create a leak.
Checks to Perform After Reassembly
After the tire change, verify:
• That there are no leaks around the valve stem.
• That the pressure reading appears normally once riding begins.
• That the displayed value is reasonable and consistent.
• That no RDC warning is present on the dashboard.
If a pressure reading that was working normally before the tire change disappears immediately afterward, inspect the installation and sensor condition before assuming that the battery has failed.
Key Takeaway
A tire change should never automatically require replacement of the RDC sensor.
However, it does require:
• Careful handling.
• Inspection of the sensor and valve stem.
• Replacement of small sealing components when their condition justifies it.
• Providing the service kit to the technician if it is not supplied by the workshop.
• Following the specified torque value.
• Checking the system after reassembly.
Related workshop article:
Chris Bach Workshop – GS/GSA LC – RDC 1: Understanding the Tire Pressure Monitoring System (TPMS)
Chris Bach Workshop – GS/GSA LC – RDC 2: How Do You Know When a Sensor Is Starting to Fail?
Access the full maintenance guide:
https://chrisbach.gumroad.com/l/iagmmp
Join the Facebook group:
https://www.facebook.com/groups/913934631041780
The blog helps you understand.
The guide helps you take action correctly, step by step.
Back to the blog:
https://chrisbachworkshop.com/blog/